
Duplicate a standard screen
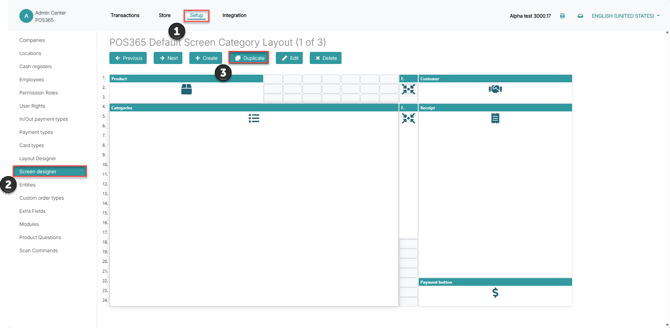
- In the Admin Center, go to Setup.
- Select Screen designer.
- Find the standard screen you want to use as a starting point and click Duplicate.
You must duplicate one of the standard screens and edit the copy to create your own screen design.
Customise your screen
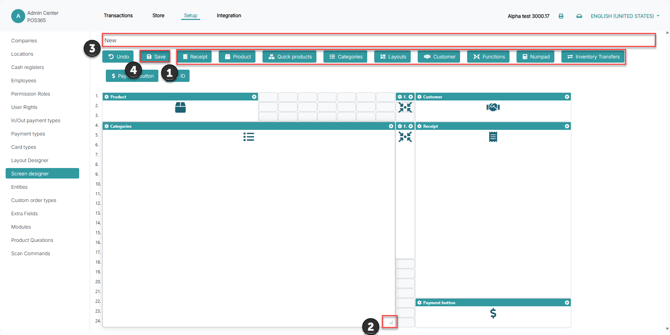
-
Use the module buttons at the top of the page to add modules to your screen.
- Move a module: Drag it to the desired position.
- Resize a module: Drag the handle in its bottom-right corner.
- Remove a module: Click the × in its top-right corner.
- Edit module settings: Click the gear icon next to the module’s name.
Configure your modules
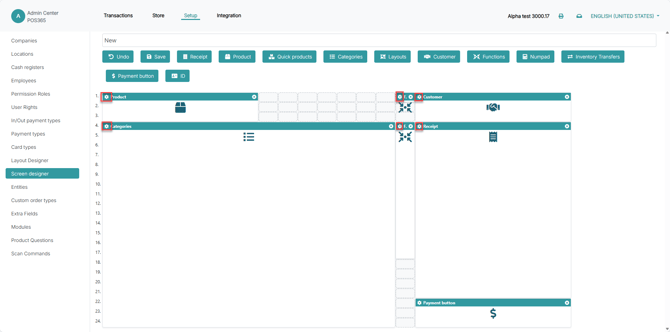
Each module has its own settings. Click the gear icon, adjust the settings, and click Update to apply them to your design.Margins — available on all modules
The Left, Right, Top, and Bottom fields let you adjust the spacing around each module. Use these fields to create space between the elements on your screen.
The table below shows the settings available for each module in addition to margins.
Module Settings Product Show picture: Choose whether to display product pictures in the module. Quick products Products: Click Pick to select the products to include. Columns: Set the number of columns used to display them. Show picture: Choose whether to display product pictures. Categories Show picture: Choose whether to display pictures in the module. Layouts Layout: Select the layout to display from the dropdown. Show picture: Choose whether to display pictures in the module. Receipt Show SKU: Choose whether to display item numbers on the receipt lines on your POS screen. Show unit of measure: Choose whether to display the unit of measure on those lines. Functions Choose which function buttons to display, arrange their order, and set their Columns and Style. See the instructions below. Customer Margins only. Payment button Margins only. Numpad Margins only. Inventory Transfers Margins only. ID Margins only. Configuring the Functions module
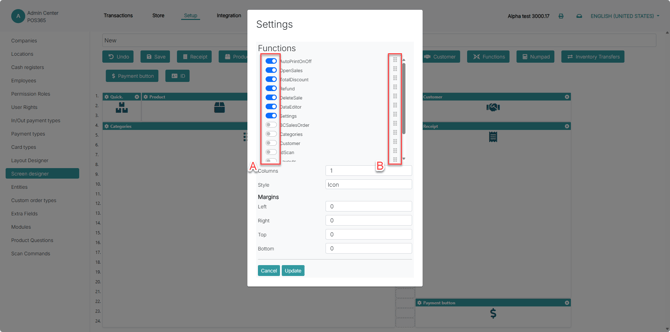
The Functions module lets you choose and arrange the function buttons shown on your screen.
- Use the switches to enable the functions you want to display. Scroll through the list to see more functions.
- Drag the handle to the right of a function to change its position in the list.
- Set Columns to define how many columns the buttons use.
- Select Style to choose how the buttons are displayed.
- Adjust the Margins if needed.
- Click Update.
Assign the design to your cash register
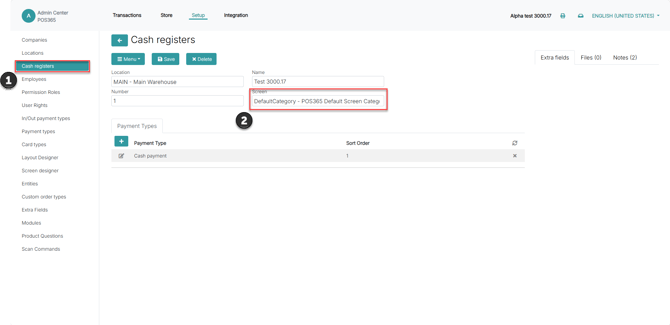
- Go to Setup → Cash registers and open the cash register you want to use the design on.
- In the Screen field, select your new screen design.
- Click Save.